
TL;DR:
- Many common AC issues can be fixed safely by homeowners with proper tools and precautions.
- Diagnosing problems involves checking the thermostat, circuit breakers, filters, and outdoor unit for debris or ice.
- When in doubt or facing complex issues, contacting a licensed HVAC technician is the safest and most effective solution.
When your AC stops working in the middle of a Kansas City summer, the heat inside your home becomes unbearable fast. You might wonder whether to call a pro immediately or try to figure it out yourself first. The good news is that many common AC issues have simple fixes you can handle on your own with a little guidance. This guide walks you through exactly what to check, how to diagnose the problem, and which repairs are safe to do yourself. We’ll also tell you honestly when it’s time to put down the screwdriver and call a licensed technician.
Table of Contents
- Essential tools, safety, and preparation before fixing your AC
- Diagnosing common AC problems: What to check first
- Step-by-step guide: How to fix your AC at home
- Testing your repair: How to confirm your AC is fixed
- What most homeowners get wrong about AC repair
- Need reliable AC repair help? Call the Kansas City HVAC pros
- Frequently asked questions
Key Takeaways
| Point | Details |
|---|---|
| Prepare safely | Always switch off power and gather proper tools before starting any DIY AC repair. |
| Check common issues first | Start with filters, thermostats, and breakers since they cause most AC problems. |
| Follow step-by-step fixes | Address the most likely problems in order for a safe, effective repair. |
| Test thoroughly | Confirm your repair worked by monitoring airflow, temperature, and system sounds. |
| Call a pro when needed | Know your limits; call an expert for major, persistent, or electrical issues. |
Essential tools, safety, and preparation before fixing your AC
Now that you know why it’s crucial to act quickly during an AC breakdown, let’s make sure you’re prepared and safe before diving into any repairs. Walking into an AC repair without the right tools or safety steps is how small problems turn into bigger ones. A little preparation goes a long way.
Basic tools you’ll need:
- Flathead and Phillips screwdrivers
- Multimeter (to test electrical components)
- Replacement air filters (check your unit’s size)
- Wet/dry vacuum (for clearing condensate drains)
- Flashlight
- Work gloves and safety glasses
- Fin comb (for straightening bent condenser fins)
Safety checklist before you start:
- Turn off the thermostat and shut off power at the breaker box
- Locate and switch off the outdoor disconnect box near your AC unit
- Wait at least 10 minutes before touching any internal components
- Wear gloves and eye protection at all times
- Never work on the unit during rain or wet conditions
As noted by AC maintenance guidance, homeowners should turn off power to the unit before performing any AC maintenance or repair. This is not optional. Skipping this step risks electric shock, which can be serious or fatal.
Workspace prep:
Clear at least two feet of space around the outdoor unit. Remove leaves, mulch, or anything else that may have piled up around the cabinet. Inside, locate your air handler (usually in a utility closet or attic) and make sure you have enough light to work safely.
| Prep step | Why it matters |
|---|---|
| Turn off power | Prevents electrical shock |
| Gather tools first | Avoids mid-repair delays |
| Clear outdoor unit area | Improves airflow and access |
| Check warranty terms | DIY repairs may void coverage |
Pro Tip: Before touching anything, take a quick photo of wiring or components you’ll be working near. If something comes apart, the photo helps you put it back correctly.
For first-time DIYers, it also helps to review seasonal HVAC maintenance steps so you understand what a well-maintained system looks like before you start. The U.S. Department of Energy also publishes official AC maintenance tips worth bookmarking.
Important: DIY repairs may void your AC manufacturer’s warranty. Always check your warranty terms before opening any sealed components or replacing parts other than filters.
Diagnosing common AC problems: What to check first
With your tools and safety steps ready, let’s move on to pinpointing the source of your AC trouble. Jumping straight into repairs without a diagnosis wastes time. Start at the most likely causes and work your way down the list.
Step-by-step diagnosis checklist:
- Check the thermostat. Make sure it’s set to “Cool” and the temperature is set lower than the current room temperature. Replace batteries if needed.
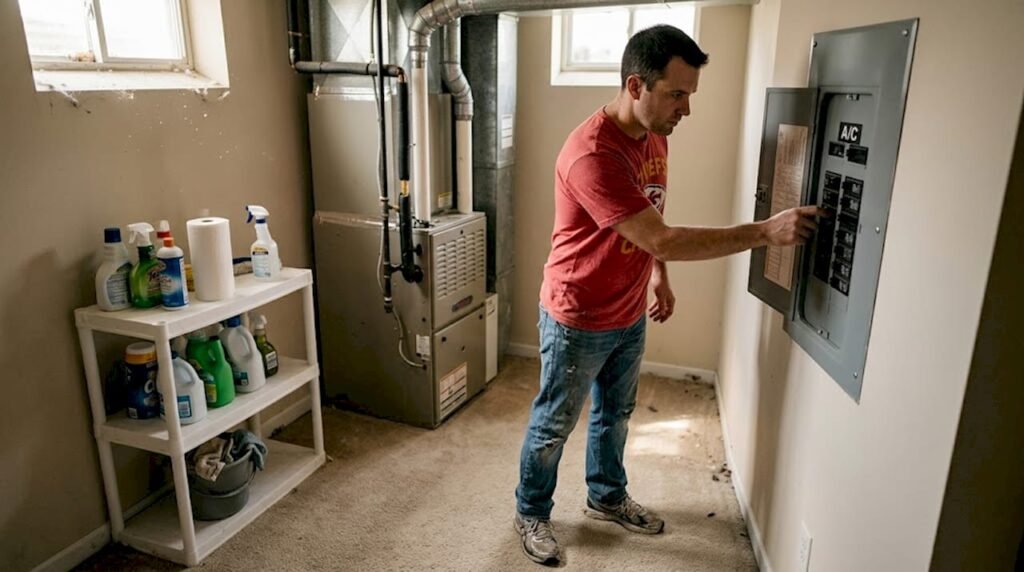
- Check the circuit breaker. Go to your electrical panel and look for a tripped breaker. If the AC breaker is in the middle position, flip it fully off, then back on.
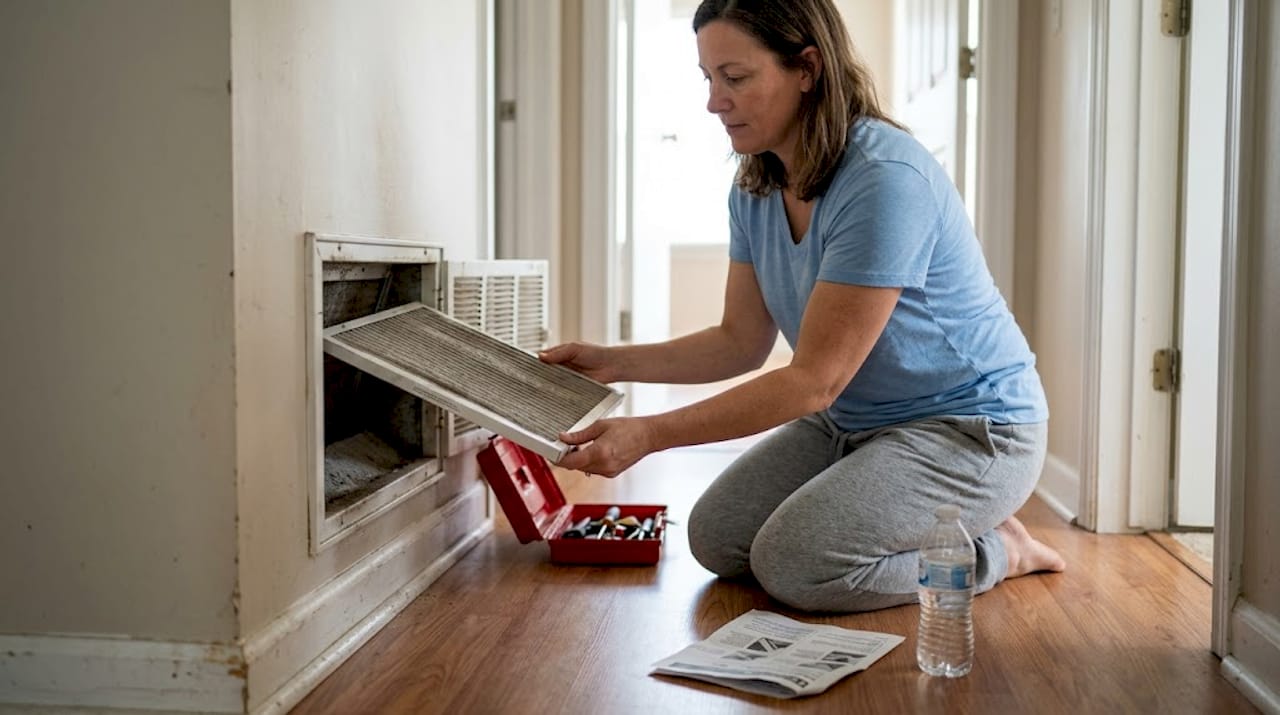
- Inspect the air filter. A clogged filter blocks airflow and forces your system to work harder. Pull it out and hold it up to light. If you can’t see through it, replace it.
- Check the vents. Make sure all supply and return vents in your home are open and unobstructed by furniture or drapes.
- Look at the outdoor unit. Check for debris buildup, ice on the coils, or the fan not spinning. These are clear signs something is wrong.
According to our research on common HVAC problems, dirty filters or incorrect thermostat settings are the most common reasons for AC not cooling properly. Start there before assuming the worst.
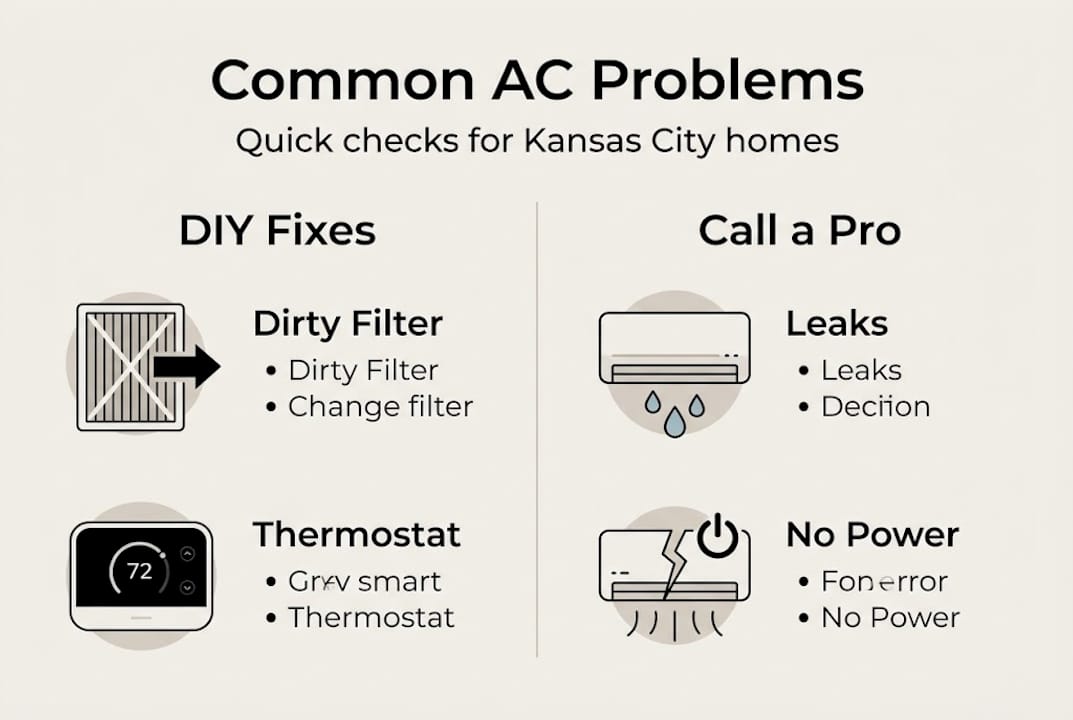
| Symptom | Likely cause | DIY or pro? |
|---|---|---|
| No cool air | Dirty filter or thermostat setting | DIY |
| AC runs but room stays hot | Refrigerant leak or low charge | Pro |
| Unit won’t turn on | Tripped breaker or blown fuse | DIY |
| Ice on outdoor unit | Restricted airflow or low refrigerant | DIY/Pro |
| Loud banging or grinding | Mechanical failure | Pro |
| Water leaking indoors | Clogged condensate drain | DIY |
Pro Tip: If you notice frequent AC failures happening every cooling season, your unit may be aging out. Most central AC systems last 15 to 20 years with regular maintenance.
For urgent situations, our emergency HVAC troubleshooting guide can help you act fast when the heat isn’t waiting.
Step-by-step guide: How to fix your AC at home
Once you’ve identified what’s wrong, it’s time to get hands-on and fix the issue. Most common fixes are straightforward, and many AC fixes such as changing filters or resetting the thermostat can be done in under 30 minutes.
1. Replace the air filter
Locate the filter slot (typically at the return air vent or inside the air handler). Slide out the old filter and note the size printed on the frame. Slide the new filter in with the arrow pointing toward the unit. Filters should be replaced every one to three months.
2. Reset the thermostat
Set the thermostat to “Cool” mode. Lower the set temperature at least five degrees below the current room temp. If your thermostat has a reset button, press and hold it for five seconds. For smart thermostats, check the settings menu for a factory reset option.
3. Clear debris from the outdoor unit
Turn off the outdoor disconnect switch. Use a garden hose to gently spray the condenser coils from the inside out. Remove leaves, grass clippings, and any buildup from the fins. Keep at least two feet of clearance around all sides.
4. Unclog the condensate drain
Locate the PVC drain line near your indoor air handler. Use a wet/dry vacuum to suction out any blockage at the end of the drain line. You can also pour a cup of diluted bleach into the drain access port to clear algae buildup.
5. Reset a tripped breaker or check fuses
Flip the tripped breaker fully off, pause for 30 seconds, then flip it back on. If it trips again immediately, stop. A breaker that trips repeatedly signals a deeper electrical problem. See more detailed steps in our AC repair guide.
Pro Tip: After clearing the condensate drain, keep a float switch installed on the drain pan. It automatically shuts off the system if the pan fills up, preventing water damage to your ceiling or floors.
Know when to stop: If you smell burning, see sparks, or find refrigerant lines coated in ice after clearing airflow issues, power down the unit and call a licensed technician. Consumer Reports also shares helpful maintenance tips for ongoing upkeep once repairs are done.
For a broader look at what regular upkeep involves, review our guide on AC maintenance tasks to stay ahead of future issues.
Testing your repair: How to confirm your AC is fixed
With your repair complete, the last step is to make sure your AC is truly back in working order. Skipping this step means you might not catch a new problem until the next hot day.
How to test your AC after repair:
- Restore power at the breaker box and outdoor disconnect
- Set the thermostat to “Cool” and lower the temperature setting
- Wait five to ten minutes before checking airflow from vents
- Hold your hand in front of a supply vent. Air should feel noticeably cool, not just slightly cooler than room temperature
- Walk through each room and verify all vents are blowing air
As outlined in our post-repair maintenance checklist, after any DIY AC repair it’s crucial to check airflow, temperatures, and system sounds before returning to regular use.
What to listen and look for:
- A steady hum from the outdoor unit is normal
- Clicking on startup and shutdown is expected
- Rattling, grinding, or banging means something is loose or broken
- A musty smell may mean mold in the ducts or drain pan
- A burning smell is an immediate signal to shut off the system
| Test | What success looks like | Red flag |
|---|---|---|
| Airflow at vent | Strong, cool airflow | Weak or warm air |
| Outdoor unit sound | Steady hum, no rattles | Grinding or banging |
| Indoor temperature | Drops within 15-20 minutes | Stays at same temp |
| Condensate drain | No water pooling near unit | Puddles or overflow |
Pro Tip: Use an inexpensive digital thermometer to check the temperature at the supply vent versus the return vent. A difference of 15 to 20 degrees Fahrenheit means your system is cooling efficiently. You can also find detailed testing guidance at test your central AC.
What most homeowners get wrong about AC repair
After years of helping Kansas City homeowners with their HVAC systems, we’ve seen the same mistakes come up again and again. The biggest one is treating a reset like a real fix. Resetting your AC might get it running again for a few hours, but if the root cause is a failing capacitor, low refrigerant, or a blocked coil, you’ll be back in the same situation within days.
Another common trap is ignoring warning signs like unusual smells or sounds. A musty odor or a faint burning smell is your system telling you something is wrong. Waiting it out often turns a minor repair into a much more expensive one. Failing to address minor issues promptly can result in costly breakdowns or early system replacement.
The smarter approach is to invest in preventive maintenance rather than waiting for a breakdown to force your hand. A tune-up each spring costs a fraction of what an emergency repair runs in July. Knowing when to call a pro isn’t giving up. It’s protecting your investment and keeping your family comfortable when Kansas City summer heat peaks.
Need reliable AC repair help? Call the Kansas City HVAC pros
Sometimes, DIY fixes aren’t enough. Here’s how to get professional help fast in Kansas City.
If your AC still isn’t cooling after working through these steps, it’s time to bring in a licensed technician. Some problems, like refrigerant leaks, failed compressors, or complex electrical faults, require professional tools and training to fix safely.
At KC Air Control, we’ve been serving Kansas City homeowners for over 70 years. Our team provides fast, reliable expert AC repair with no guesswork. We also offer professional HVAC maintenance plans that keep your system running efficiently all season long. Whether you need a quick repair or a full system evaluation, we make it easy to schedule and get back to comfortable. Explore all of our HVAC solutions in Kansas City and book your service today.
Frequently asked questions
How do I know if my AC problem is a simple DIY fix or needs a pro?
If the cause is a dirty filter, tripped breaker, or thermostat issue, it’s usually safe to fix yourself. As we outline in our guide on common HVAC problems, electrical issues, refrigerant leaks, or persistent problems should be handled by a licensed HVAC technician.
What’s the first thing to check when my AC isn’t cooling?
Always start with the thermostat setting, then change the filter, and make sure the outdoor unit is clear of debris. Dirty filters and thermostat issues are the most common reasons for AC failure.
How often should AC filters be replaced in Kansas City?
AC filter changes should happen every one to three months depending on usage. Homes with pets, allergies, or heavy dust may need changes closer to every four to six weeks.
Can I reset my AC unit myself?
Yes. Most home AC units can be reset by turning off the power at the breaker for five minutes, then restoring it. However, simple resets can only resolve surface-level issues, so call a pro if the problem keeps coming back.
What are the signs I need emergency AC repair?
Burning smells, loud grinding noises, major electrical issues, or a complete loss of airflow are all signals to stop using the unit immediately. Turn off your unit and call a Kansas City HVAC pro right away if you notice any of these warning signs.
Recommended
- How to identify HVAC issues: Kansas City homeowner’s guide – KC Air Control – Heating & Cooling
- Common HVAC problems and solutions for Kansas City homes – KC Air Control – Heating & Cooling
- Step-by-Step Furnace Repair Guide for Kansas City Homes – KC Air Control – Heating & Cooling
- Emergency HVAC Repair Workflow KC: 35% Faster Fixes – Air Control