
Sudden HVAC breakdowns catch Kansas City homeowners off guard, especially when comfort is threatened by extreme weather. When your system stops working, knowing the right steps keeps your household safe and avoids costly mistakes. From checking the thermostat and electrical panel to inspecting filters and recognizing urgent warning signs, this guide highlights the safest troubleshooting approach and how to spot issues needing professional help.
Table of Contents
- Step 1: Assess Immediate Safety and Power Issues
- Step 2: Inspect HVAC Filters and Thermostat Settings
- Step 3: Examine System Components for Common Failures
- Step 4: Test HVAC Operation After Troubleshooting
Quick Summary
| Key Point | Explanation |
|---|---|
| 1. Assess safety and power first | Check thermostat display and electrical panel to identify immediate hazards before proceeding with troubleshooting. |
| 2. Inspect air filter regularly | A clogged air filter can cause system shutdowns; replace it every 30 to 90 days based on usage and conditions. |
| 3. Check thermostat settings | Ensure thermostat is set to the correct mode and temperature; replace batteries if the display is unresponsive. |
| 4. Examine system components for damage | Look for debris, signs of corrosion, or faulty wiring to identify issues that may require professional service. |
| 5. Test HVAC operation thoroughly | Run the system and check air output, ensuring proper airflow and temperature; document any ongoing issues for technicians. |
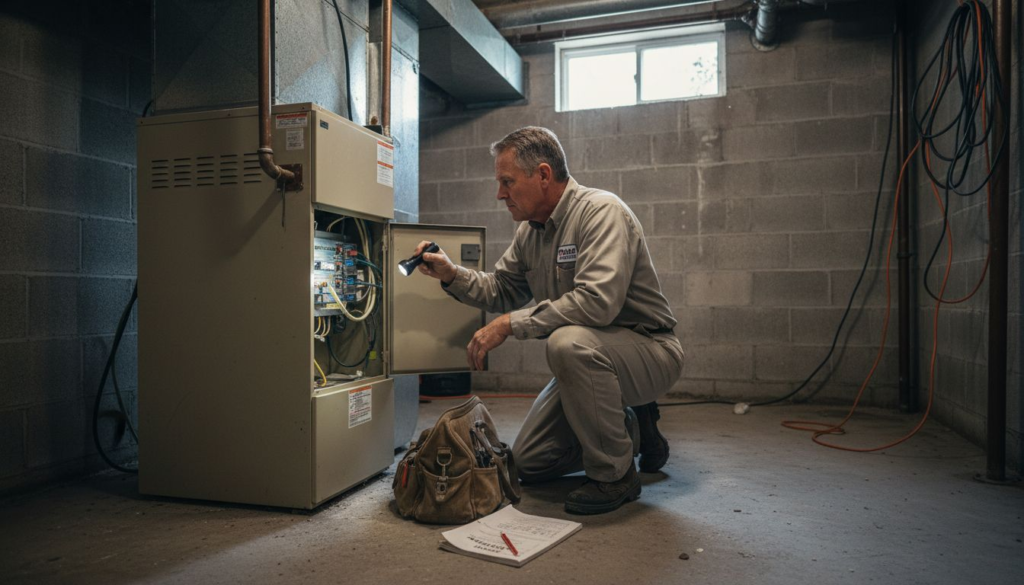
Step 1: Assess Immediate Safety and Power Issues
Before you touch anything on your HVAC system, take a moment to evaluate what you’re dealing with. Safety comes first, and that means checking for immediate hazards and understanding whether your system has power.
Start by looking at your thermostat display. Is it showing any readings, or is the screen completely blank? A blank screen suggests a power problem right away. Check if the system is responding to temperature changes or if it’s completely unresponsive.
Next, head to your electrical panel and look for any tripped circuit breakers. This is often the culprit behind sudden HVAC failures. Find the breaker labeled for your heating or cooling system and see if it’s switched to the “off” position. If it is, that explains why your system isn’t running.
Before flipping any breakers back on, stop and observe your surroundings:
- Look for water pooling near your furnace or outdoor unit
- Check for burning smells or unusual odors coming from vents
- Listen for strange grinding, squealing, or banging sounds
- Feel if the air near the system is unusually hot or cold
These signs tell you if there’s a deeper problem that needs professional attention before power is restored.
A tripped breaker often means your system is protecting itself from an electrical fault. Flipping it back on without investigating could cause damage or safety risks.
If the breaker looks normal and the thermostat display is on, the problem isn’t a simple power loss. Proper electrical safety and de-energization procedures are critical if you need to inspect electrical components further—this is where you should call a professional rather than risk electrical shock.
Check your air filter while you’re at the unit. A completely clogged filter can cause the system to shut down automatically as a safety measure. If it’s dark and blocked, that might be your issue.
Now that you’ve assessed the immediate safety and power situation, you’ll know whether to proceed with basic troubleshooting or contact a professional right away.
Here’s a quick reference of HVAC emergency indicators and their implications:
| Indicator Location | What to Look For | Potential Impact |
|---|---|---|
| Thermostat | Blank display | Possible power loss or malfunction |
| Electrical Panel | Tripped breaker | Electrical fault; system shutdown |
| Air Filter | Clogged or dark filter | Automatic safety shutdown |
| Furnace/Outdoor Unit | Water pooling, burning smell | Severe system or safety issue |
| Air Vents | Strange noises or temperature | Mechanical problem or airflow loss |
Pro tip:Keep your circuit breaker panel clearly labeled so you can identify the HVAC breaker instantly during an emergency—this saves time and confusion when every minute of lost comfort matters.
Step 2: Inspect HVAC Filters and Thermostat Settings
Now that you’ve confirmed your system has power, it’s time to check two things that often cause problems: your air filter and your thermostat settings. These are usually the first culprits behind reduced comfort or system shutdowns.
Start by locating your air filter. Most residential systems have a filter located in a return air duct or blower compartment, typically near your furnace or air handler. Look at the filter closely under good lighting. A clean filter should be white or light gray, allowing air to flow freely through it.
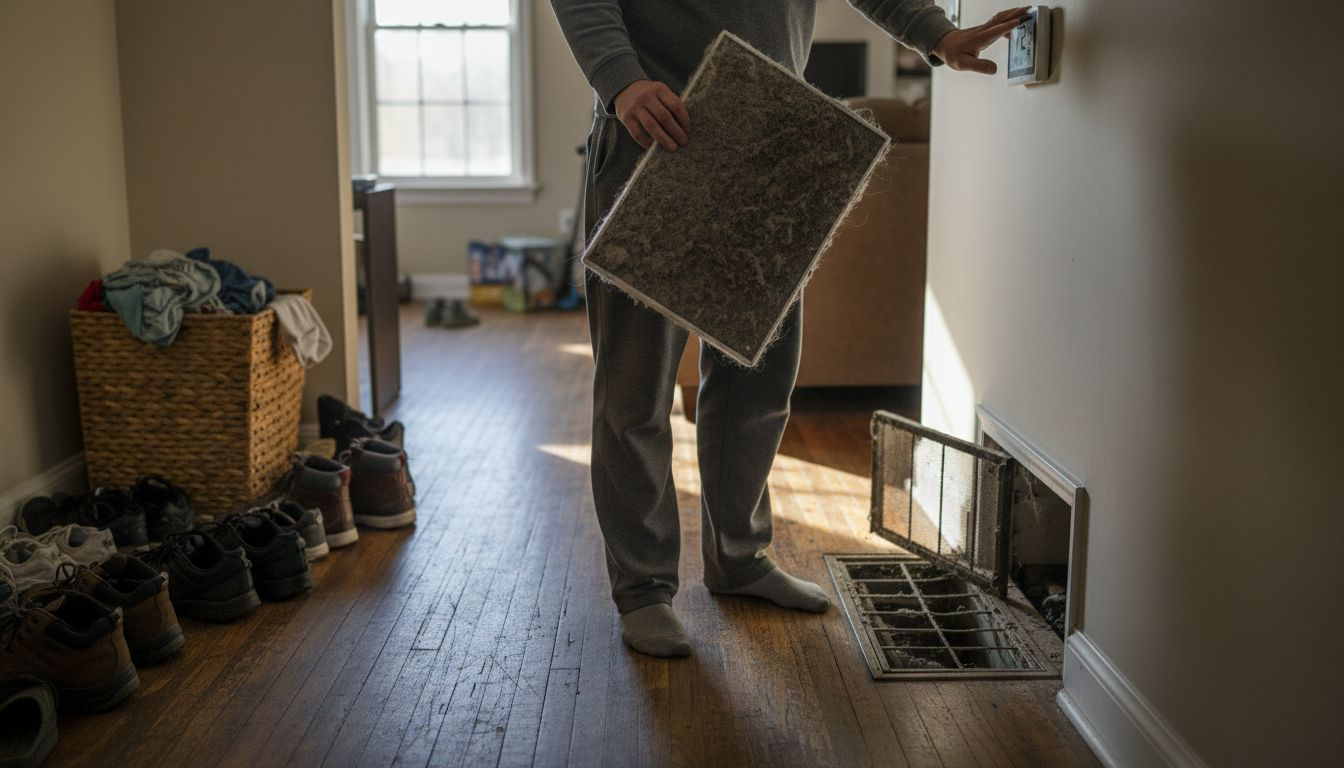
If your filter looks dark, caked with dust, or completely blocked, that’s your problem. A clogged filter restricts airflow severely, which forces your system to work harder and can trigger automatic shutdowns as a safety measure. You should be able to see light through a clean filter when you hold it up. If you can’t, it needs replacing right away.
Check the filter size printed on its frame (usually something like 16x25x1 or 20x20x1) so you grab the correct replacement. Most homeowners should replace filters every 30 to 90 days depending on pet hair, dust levels, and system use.
Once you’ve inspected the filter, move to your thermostat. Check that it’s set to the correct mode:
- Heat mode for winter or cooling situations
- Cool mode for air conditioning needs
- Fan setting on Auto or On (Auto cycles the fan as needed; On runs it continuously)
- Temperature set to your desired comfort level
Verify the thermostat display is showing the current temperature. If it’s blank or unresponsive, the batteries might be dead, or it could need a reset. Replace batteries if you see a low battery indicator.
Regular inspection and maintenance of HVAC components, including filters and controls, prevents operational faults and maintains system efficiency.
If your thermostat has a programmable schedule, check that it matches your current needs. Sometimes programming gets changed by accident or becomes outdated with the seasons, causing the system to run at unexpected times.
With your filter and thermostat checked, you’ll know if either of these simple issues was preventing your system from working properly.
Pro tip:Write the filter size on a sticky note and place it on your furnace or in your phone so you always have it handy when shopping for replacements, saving you a trip if you grab the wrong size.
Comparing filter and thermostat troubleshooting steps for HVAC systems:
| Step | Filter Troubleshooting | Thermostat Troubleshooting |
|---|---|---|
| What to Inspect | Dust, color, light visibility | Mode, display, battery, schedule |
| Common Findings | Clogged, wrong size, expiration | Incorrect mode, blank screen, reset |
| Effect on Comfort | Reduced airflow, shutdown risks | Incorrect temperature, system off |
| Next Action | Replace filter, note size | Set correct mode, replace batteries |
Step 3: Examine System Components for Common Failures
If your filter and thermostat look fine, it’s time to inspect the actual HVAC components for visible damage or obvious malfunctions. You don’t need to be a technician to spot several common problems that prevent systems from working.
Start by examining the outdoor condenser unit if you have air conditioning. Look for debris like leaves, dirt, or branches blocking the fins. These metal fins should be relatively clean and upright. Bent fins restrict airflow and reduce cooling efficiency significantly. If you see ice buildup on the unit during warm weather, that signals a serious problem requiring professional service.
Next, check the indoor unit or furnace area for visible issues:
- Inspect all visible wiring for burns, melting, or loose connections
- Look for corrosion or rust on metal components
- Check if any access panels are missing or loose
- Listen for unusual grinding, squealing, or rattling sounds
- Feel around air vents to ensure warm or cool air is actually flowing
Pay attention to capacitors near the compressor or motors. These cylindrical components sometimes bulge or leak, which indicates failure. A failed capacitor prevents motors from starting even when power is present. If you see a burned or bulging component, don’t touch it—call a professional immediately.
Check all visible connections and ductwork for gaps or disconnected sections. Flexible ducts sometimes come loose from connection points, allowing conditioned air to escape into unconditioned spaces like attics or crawl spaces. This reduces system performance dramatically.
Identifying common issues such as blown fuses, faulty capacitors, and wiring problems can restore HVAC functionality and help you know when professional service is necessary.
Examine the air handler blower if accessible. It should spin freely when you gently push it by hand (system off). If it’s stuck, seized, or making grinding noises, the blower motor needs replacement.
If everything appears visually intact and operational, document what you’ve found. This information helps technicians diagnose problems faster if you need to call for service.
Pro tip:Take photos of your system components and note serial numbers on your phone before an emergency happens, so you can quickly reference them when describing issues to a professional technician.
Step 4: Test HVAC Operation After Troubleshooting
You’ve checked power, inspected filters, examined components, and made any necessary fixes. Now comes the crucial part: confirming your system actually works and delivers comfort back to your home.
Start by setting your thermostat to your desired temperature. If you had it adjusted during troubleshooting, return it to normal settings now. Give the system a few minutes to respond before expecting results.
Listen carefully for the startup sequence. You should hear the system engage, whether that’s a furnace ignitor clicking on or an air conditioning compressor humming to life. These sounds indicate your system is attempting to operate. If you hear nothing after a few minutes, the problem persists and you’ll need professional help.
Now check the air output at your vents and returns:
- Feel the air coming from multiple vents throughout your home
- Confirm warm air during heating or cool air during cooling
- Check that air pressure feels normal (not weak or restricted)
- Walk through different rooms to ensure even distribution
Verify your thermostat is responding by adjusting the temperature up or down by a few degrees. The system should cycle on and off as needed. If the display shows the correct temperature and responds to your adjustments, the thermostat is communicating properly with the unit.
Run the system through a complete heating or cooling cycle. This typically takes 15 to 30 minutes depending on your system size and home insulation. During this time, you should feel gradual temperature changes in your living spaces.
Systematic performance testing, including airflow and temperature control verification, confirms that repairs are effective and your system operates safely and efficiently.
Check all return air grilles to ensure they’re not blocked by furniture, curtains, or debris. Blocked returns reduce system efficiency and can trigger shutdowns.
If your system cycles normally, temperatures change noticeably, and air flows freely through your home, congratulations—you’ve successfully resolved the emergency. Your HVAC is back to providing reliable comfort.
If problems persist after troubleshooting, professional service from KC Air Control becomes necessary. Technicians can diagnose issues beyond basic visual inspection and make permanent repairs.
Pro tip:Record your thermostat reading and room temperatures before calling a technician if problems continue, giving them baseline data that speeds up diagnosis and reduces your service call time.
Restore Your Home Comfort with Trusted HVAC Experts
Dealing with an HVAC emergency can be stressful and uncomfortable especially when power issues, clogged filters, or component failures disrupt your heating or cooling system. This guide highlights how quick troubleshooting steps can help but some problems need expert care. If you want to avoid the risks of electrical faults, persistent system malfunctions, or inefficient air flow, it is time to rely on professionals with deep experience fully equipped to restore your comfort quickly and safely.
At KC Air Control, we understand the urgency in restoring home comfort fast. With over 70 years of trusted service in the Kansas City area, we specialize in reliable AC repair, furnace service, duct cleaning, and indoor air quality solutions. To keep your system running smoothly and avoid future emergencies, explore our Importance Of Maintenance – Air Control resources. Ready for expert help or proactive upkeep visit https://kcaircontrol.com to schedule service and take control of your home’s climate today.
Frequently Asked Questions
What should I check first if my HVAC system is not working?
Start by assessing power issues and safety hazards. Look at your thermostat for a display and check your electrical panel for tripped breakers. If everything appears normal, inspect your air filter for clogs that could restrict airflow.
How can I tell if my air filter needs to be replaced?
A filter that is dark, caked with dust, or blocks light needs to be replaced. Check the filter every 30 to 90 days, and replace it with the correct size if it looks dirty. This simple step can help maintain proper airflow and prevent shutdowns.
What signs indicate I should call a professional for HVAC issues?
If you notice unusual noises, burning smells, or see water pooling around your unit, it’s time to call a professional. Additionally, if your system doesn’t respond after checking the thermostat and electrical panel, expert help is needed to avoid further damage.
How do I test my HVAC system after troubleshooting?
To test your HVAC system, set the thermostat to your desired temperature and listen for the startup sequence. Check for warm or cool air across multiple vents within 15 to 30 minutes to confirm the system is operating correctly.
What should I do if my HVAC system still doesn’t work after troubleshooting?
If your HVAC system isn’t functioning after basic troubleshooting, document your observations and contact an HVAC technician. Provide them with the details you gathered, like unusual noises or temperature readings, to expedite diagnosis and repairs.