
TL;DR:
- A professional duct cleaning process follows a seven-step workflow, including inspection, protection, negative air pressure, agitation, debris removal, component cleaning, and verification. It requires specialized equipment such as HEPA-filtered vacuums, manometers, and inspection cameras to ensure thorough cleaning and avoid contamination redistribution. Homeowners should ask for documentation and verification during service to ensure proper cleaning and maintain air quality between professional visits.
A professional duct cleaning workflow is defined as a structured, sequential process covering inspection, area protection, negative air pressure, mechanical agitation, debris removal, and final verification. This process is the industry-recognized standard for improving indoor air quality and HVAC efficiency in residential homes. The formal term used by the National Air Duct Cleaners Association (NADCA) is “source removal cleaning,” and it goes well beyond simply vacuuming register covers. Professional duct cleaning typically lasts 3–5 hours and follows six core stages. Kcaircontrol follows this same structured approach for every Kansas City home we service.
What tools and preparations are needed for a safe duct cleaning workflow?
The right equipment separates a thorough cleaning from one that simply moves dust around. Professional technicians rely on HEPA-filtered vacuum systems, rotary brush agitation tools, compressed air whips, and manometers to verify negative pressure. Each piece of equipment has a specific role in the process.
Here is what a properly equipped duct cleaning setup includes:
- HEPA-filtered vacuum unit. HEPA filtration captures 99.97% of particles as small as 0.3 microns, including mold spores, dust mite debris, and fine particulate matter. Without HEPA filtration, contaminants can be released back into your living space.
- Negative air machine. This creates continuous suction inside the duct system. Negative air pressure above 3,000 CFM is the benchmark set by NADCA ACR 2021 standards.
- Manometer. This device measures the pressure differential inside the duct system. Technicians use it to confirm that negative air is maintained throughout the entire cleaning.
- Rotary brushes and compressed air tools. These loosen debris bonded to duct walls before the vacuum extracts it.
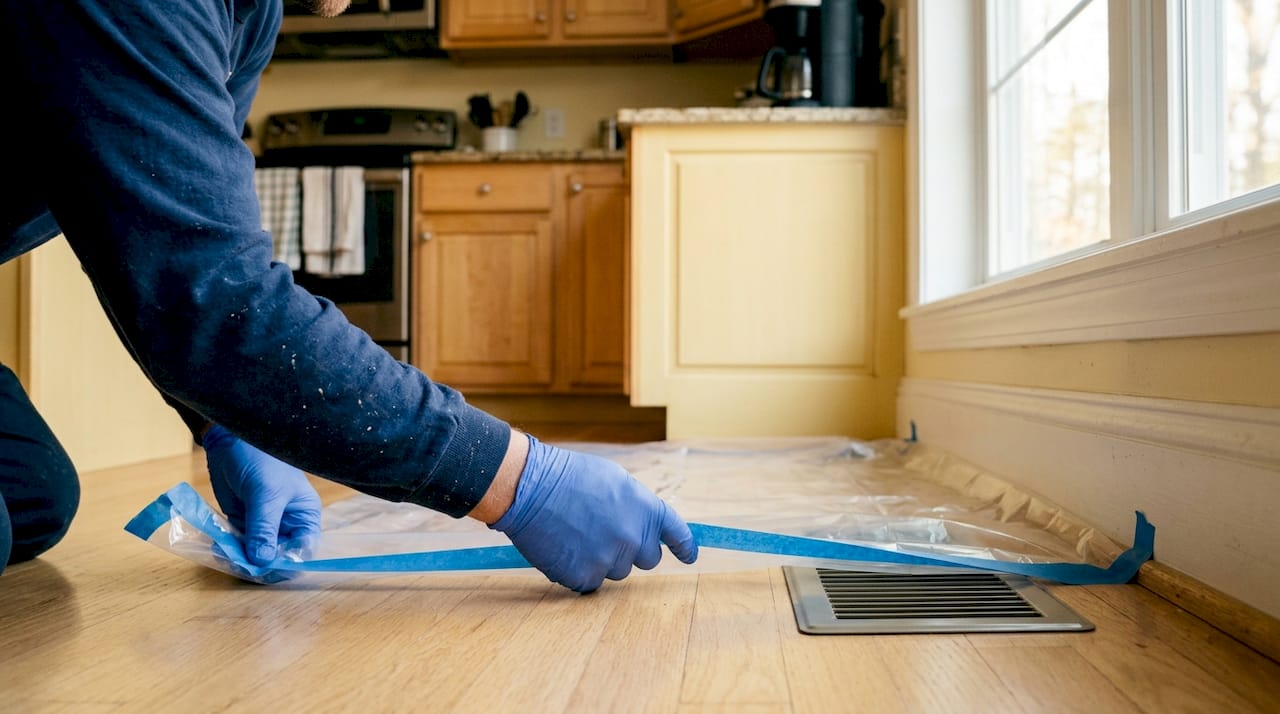
- Plastic sheeting and drop cloths. These protect your floors, furniture, and vents from dislodged dust during the process.
- Access panels and inspection camera. Cameras allow technicians to document conditions before and after cleaning.
Home preparation on your end is straightforward. Clear a path to your HVAC unit and all supply and return vents. Remove fragile items from nearby shelves. Make sure pets are secured in a separate room during the service.
Pro Tip: Ask your technician to confirm that their vacuum unit meets or exceeds NADCA ACR 2021 standards and that they use a manometer to verify negative pressure. Any reputable provider will answer this without hesitation.
How do you perform each step in the duct cleaning process?
A well-executed air duct maintenance process follows a strict sequence. Skipping or reordering steps leads to recontamination or missed debris. Here is the complete walkthrough.
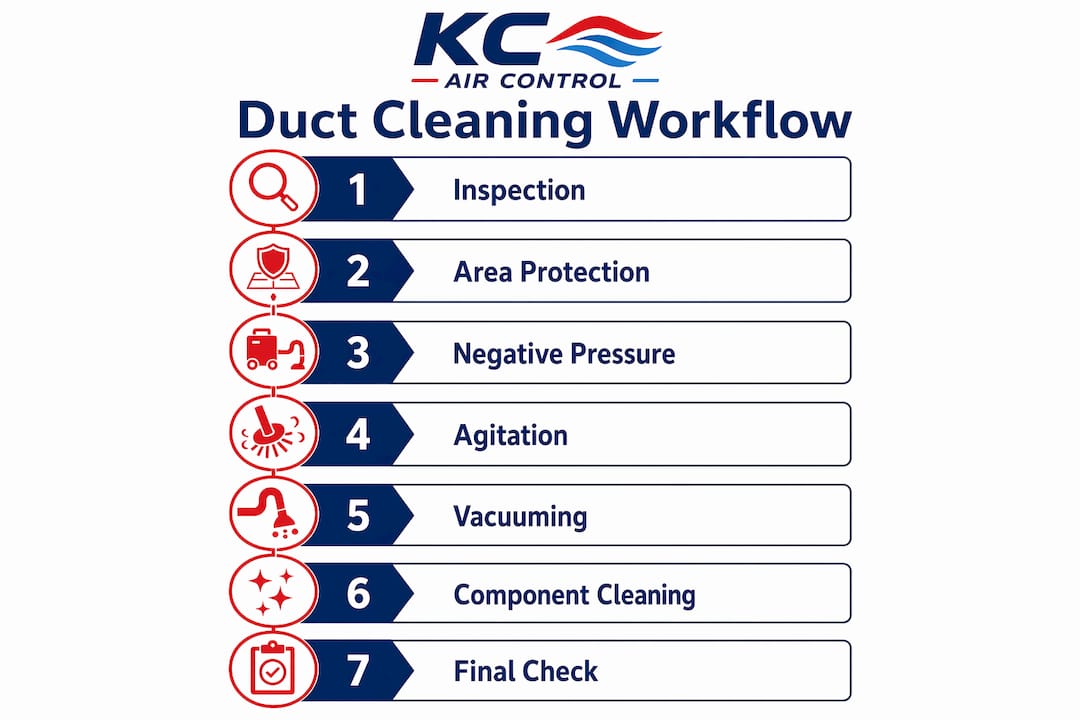
Step 1: Comprehensive inspection
The technician inserts a camera into the duct system to document existing conditions. This footage serves as your baseline and protects you if disputes arise later. The inspection identifies visible mold, pest activity, debris buildup, and any damaged ductwork that needs repair before cleaning begins.
Step 2: Area protection and access preparation
Technicians seal all supply and return registers except the one connected to the vacuum unit. They lay plastic sheeting over floors and nearby furniture. Access holes are cut or existing panels are opened to reach trunk lines and internal components. Comprehensive duct cleaning requires access beyond just vents or register covers, reaching the main trunk lines and HVAC cabinet.
Step 3: Establishing negative air pressure
The HEPA vacuum unit connects to the main trunk line or a dedicated access point. The technician powers it on and uses a manometer to confirm the pressure differential is sufficient. Without verified negative pressure, cleaning may only redistribute contaminants rather than remove them. This step must be confirmed before any agitation begins.
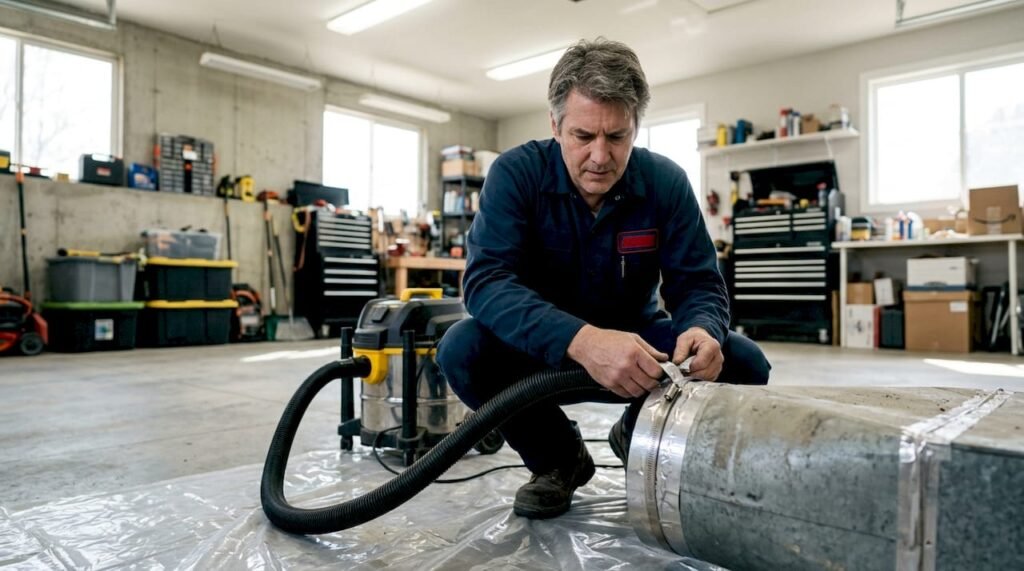
Step 4: Mechanical agitation
Rotary brushes and compressed air whips travel through each duct branch, scrubbing debris from the walls. The technician works systematically from the farthest branch back toward the main trunk. The negative air pressure pulls loosened debris toward the vacuum unit continuously during this phase.
Step 5: HEPA vacuum extraction
With agitation complete, the vacuum unit captures all dislodged material. Technicians check each branch to confirm debris has been fully extracted. Professional-grade equipment and strict protocol adherence are what separate effective extraction from partial cleaning.
Step 6: HVAC component cleaning
The blower motor, evaporator coil, and drip pan require separate attention. These components accumulate biological growth and fine particulate that recirculates through the system if left uncleaned. Technicians use specialized brushes and approved cleaning agents on each component. Sanitizing treatments must only be applied after thorough cleaning to avoid sealing contaminants inside the system.
Step 7: Final inspection and verification
The technician reinserts the camera to document post-cleaning conditions. Results are compared against NADCA ACR 2021 acceptance criteria. You should receive before and after footage as part of the service record.
Pro Tip: Request a copy of both the pre-cleaning and post-cleaning camera footage. This documentation confirms the work was completed properly and gives you a record for future service comparisons.
The table below summarizes each stage and its primary purpose.
| Stage | Primary purpose |
|---|---|
| Inspection | Document baseline conditions with camera footage |
| Area protection | Prevent dust spread and prepare duct access points |
| Negative air setup | Create continuous suction to capture debris |
| Mechanical agitation | Loosen bonded debris from duct walls |
| HEPA extraction | Remove all dislodged contaminants from the system |
| Component cleaning | Clean blower, coil, and drip pan |
| Final verification | Confirm results meet NADCA ACR 2021 standards |
Common mistakes homeowners make during duct cleaning
Many homeowners schedule a “duct cleaning” and receive only a vent cleaning. These are not the same service. Vent cleaning does not reach trunk lines or internal HVAC components, which is where the majority of debris accumulates. True source removal cleaning requires physical access to the full duct system.
Watch for these common problems:
- No negative pressure verification. If a technician does not use a manometer, there is no confirmation that debris is being captured rather than redistributed. This is a fundamental step, not optional.
- Skipping component cleaning. Cleaning ducts without addressing the blower and coil leaves a contamination source active inside your system.
- Applying sanitizers too early. EPA guidelines state that sanitizing chemicals must only be used after thorough cleaning and only with EPA-registered products that have a clear, documented purpose.
- No before and after documentation. Without camera footage, you have no way to confirm the work was done correctly.
“Homeowners should always ask for before and after camera footage and confirm that the technician uses a manometer to verify negative pressure. These two requests alone will filter out most low-quality providers.”
Pro Tip: Before booking any service, ask three direct questions: Do you use a HEPA-filtered vacuum? Do you verify negative pressure with a manometer? Will you provide before and after camera footage? A qualified technician will say yes to all three.
How does duct cleaning fit into ongoing air duct maintenance?
Professional duct cleaning is recommended every 3–5 years for most homes, with more frequent service needed after renovations, pest activity, or water damage. Between professional visits, consistent home habits reduce contamination buildup significantly.
The EPA recommends maintaining indoor humidity between 30–50% to prevent mold growth inside ductwork. Humidity control is one of the most effective preventive measures available to homeowners.
Follow these air duct maintenance steps between professional cleanings:
- Replace air filters every 1–3 months. Use a MERV 8 or higher rated filter to capture fine particles before they enter the duct system.
- Run bathroom and kitchen exhaust fans consistently. Proactive moisture control through exhaust fans directly reduces the conditions that allow mold and debris to accumulate in ducts.
- Inspect visible ductwork annually. Look for disconnected joints, visible dust buildup around registers, or signs of pest activity.
- Schedule professional cleaning sooner if you notice musty odors, increased allergy symptoms, or reduced airflow from registers.
- Pair duct cleaning with HVAC maintenance. Combining duct cleaning with a regular HVAC maintenance visit extends the life of your system and keeps air quality consistent year-round.
Understanding why clean air vents matter for your home’s health reinforces why these habits are worth maintaining consistently.
Key takeaways
A proper duct cleaning workflow requires seven sequential steps, verified negative air pressure, HEPA filtration, and post-cleaning camera documentation to deliver lasting indoor air quality results.
| Point | Details |
|---|---|
| Follow the full seven-step sequence | Skipping steps like negative pressure setup or component cleaning leads to recontamination. |
| Verify negative pressure with a manometer | Unverified pressure means debris may be redistributed, not removed. |
| Clean HVAC components too | Blower, coil, and drip pan must be cleaned alongside ducts for complete results. |
| Request camera documentation | Before and after footage confirms the work meets NADCA ACR 2021 standards. |
| Maintain between professional visits | Filter changes, humidity control, and exhaust fan use reduce buildup between 3–5 year cleanings. |
What I’ve learned after watching hundreds of duct cleanings go wrong
Most homeowners assume that any company showing up with a vacuum truck is doing the job correctly. That assumption costs people money and leaves their air quality unchanged. The single biggest gap I see is the absence of negative pressure verification. Technicians skip the manometer because it adds time and most homeowners do not know to ask for it. Standardized, sequential workflows exist precisely because shortcuts create callbacks and health complaints.
The second gap is documentation. A technician who refuses to provide before and after camera footage is telling you something important. Quality work is easy to prove. The footage takes minutes to capture and costs nothing extra to share.
My honest advice: treat duct cleaning like any skilled trade service. Ask specific questions before booking. Confirm the equipment meets NADCA standards. Request the footage. A provider who welcomes those questions is the one worth hiring. The process itself is not complicated when done correctly. The challenge is finding someone who actually follows it.
— AB
Kcaircontrol’s professional duct cleaning services for Kansas City homes
Kcaircontrol has served Kansas City homeowners for over 70 years, and our duct cleaning service follows the full seven-step workflow described in this guide, including HEPA vacuum extraction, manometer-verified negative pressure, and before and after camera documentation.
Every cleaning addresses the full duct system and internal HVAC components, not just the registers. We follow NADCA ACR 2021 standards on every job. If your home shows signs of reduced airflow, musty odors, or it has been more than five years since your last cleaning, now is a practical time to schedule a visit. If you also notice other HVAC performance issues, our team can assess signs you need HVAC repair during the same visit. Contact Kcaircontrol to schedule your service and get your air quality back on track.
FAQ
How long does a professional duct cleaning take?
A professional residential duct cleaning typically takes 3–5 hours, depending on the size of the home and the condition of the duct system.
How often should you schedule duct cleaning?
Most homes benefit from professional duct cleaning every 3–5 years. Schedule sooner after renovations, pest infestations, or visible mold growth inside the system.
What is the difference between vent cleaning and duct cleaning?
Vent cleaning only addresses register covers and surface-level openings. True duct cleaning reaches trunk lines, branch ducts, and internal HVAC components, which is where most contamination accumulates.
What does negative air pressure do during duct cleaning?
Negative air pressure pulls loosened debris toward the vacuum unit rather than letting it escape into your home. A manometer confirms the pressure is sufficient before agitation begins.
Should sanitizing chemicals be used during duct cleaning?
Sanitizing chemicals should only be applied after thorough mechanical cleaning is complete. The EPA recommends using only EPA-registered products with a documented purpose, never as a substitute for physical debris removal.