
TL;DR:
- Thermostat installation involves safely disconnecting old wiring and mounting a new device with proper labeling. Proper preparation, including turning off power and labeling wires by terminal, increases success and safety. A missing C-wire can cause smart thermostats to malfunction, and professional help is recommended for complex wiring or HVAC systems.
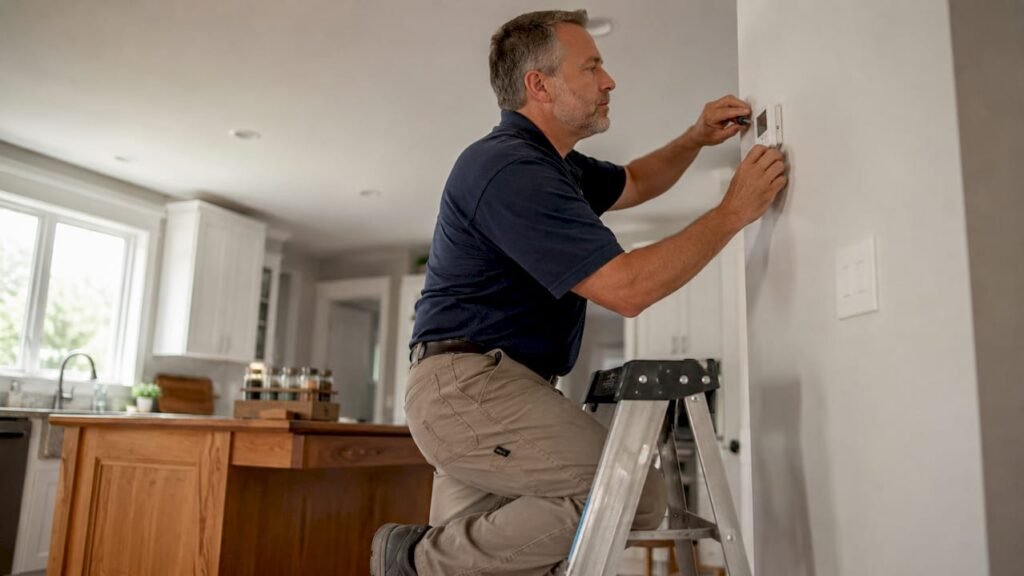
Thermostat installation is the process of replacing or upgrading your home’s temperature control unit by safely disconnecting old wiring, mounting a new device, and reconnecting each wire to the correct terminal. You can complete this job yourself with basic tools and about 30–60 minutes of focused work. The key requirements are turning off power at the breaker, labeling every wire before you touch it, and matching each wire to the right terminal on the new unit. This guide walks you through every step, covers the C-wire situation that trips up most smart thermostat installs, and tells you exactly when to call a professional.
What tools and materials do you need to install a thermostat?
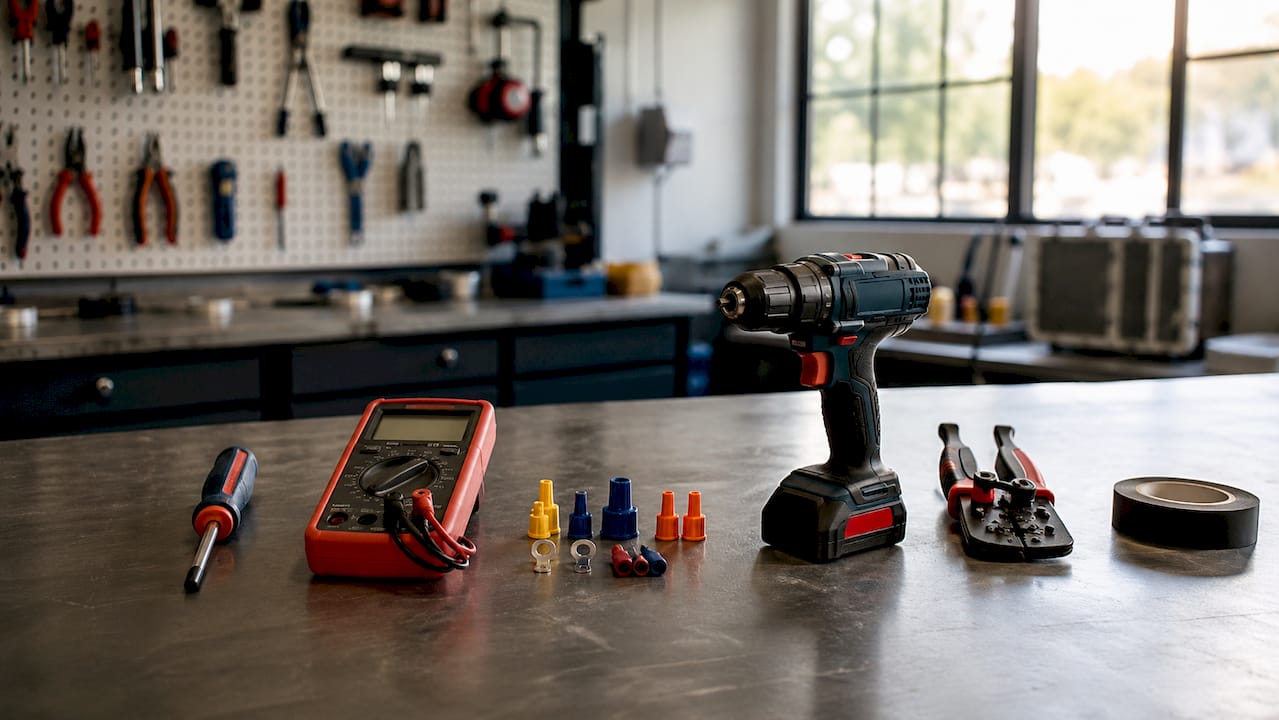
The right tools make thermostat replacement safe and accurate. Gather everything before you start so you are not hunting for supplies mid-job.
Basic tools you need:
- Phillips-head screwdriver — removes the old baseplate and secures the new one
- Voltage tester — confirms power is off before you touch any wires
- Drill with wall anchors — needed if your wall studs do not align with the mounting holes
- Level — keeps the new baseplate straight, which matters for display readability and proper mounting
- Wire labels or masking tape and a marker — lets you tag each wire with its terminal letter before disconnecting
Optional but helpful items:
- C-wire adapter — required if your system lacks a common wire and you are installing a smart thermostat
- Smartphone — needed to complete setup on Wi-Fi enabled models like the Google Nest or Ecobee SmartThermostat
- Pencil or pen — useful for wrapping loose wires around so they do not slip back into the wall
Pro Tip: Take a clear photo of your existing wiring before you disconnect a single wire. That photo is your backup reference if a label falls off or you lose track of a connection.
Home Depot’s installation guide specifically calls out the voltage tester and wire tape as non-negotiable safety items. Skipping either one creates real risk of electric shock or a wire falling into the wall cavity.
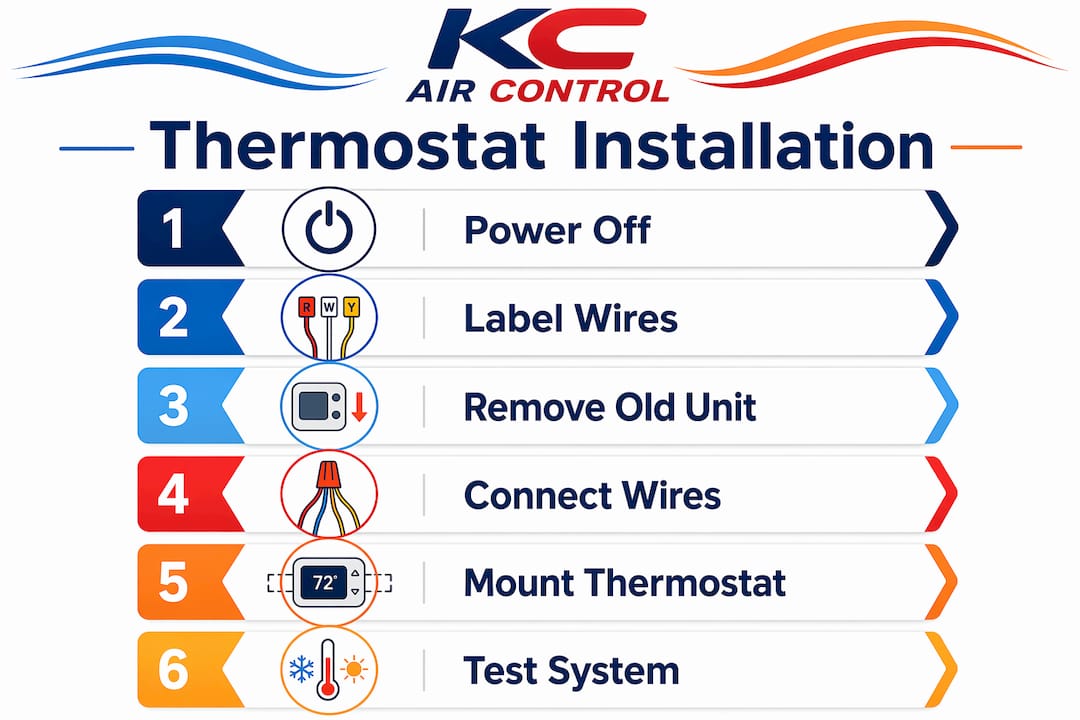
How to install a thermostat: step-by-step process
Bryant’s 2026 installation guide frames the entire process around two principles: safety first, then methodical workflow. Follow these steps in order and do not skip ahead.
-
Turn off power at the breaker. Locate your HVAC breaker in the electrical panel and switch it off. Use your voltage tester at the thermostat wires to confirm zero voltage before proceeding. Do not rely on the thermostat’s own off switch.
-
Remove the old thermostat faceplate. Most faceplates snap off or have one small screw. Set it aside. You will see the baseplate still attached to the wall with the wires running through it.
-
Label every wire before disconnecting. Write the terminal letter (R, G, Y, W, C, etc.) on a piece of tape and wrap it around each wire. Labeling by terminal letter rather than relying on wire color is the single most important step for accurate wiring. Wire colors are not standardized across manufacturers, but terminal letters are.
-
Disconnect the old wires and remove the baseplate. Unscrew each wire from its terminal, then unscrew the baseplate from the wall. Wrap each wire around a pencil or tape it to the wall so it cannot fall back into the hole.
-
Mount the new baseplate level on the wall. Hold it against the wall, use your level to align it, then mark and drill holes if needed. Insert wall anchors and screw the baseplate in place. A crooked baseplate causes the faceplate to sit unevenly and can stress the wiring connections.
-
Connect each labeled wire to the matching terminal on the new thermostat. Push each wire firmly into its terminal until it clicks or tighten the screw. Double-check every connection against your photo and your labels. Loose connections are the leading cause of a thermostat that powers on but fails to control the system.
-
Snap on the new faceplate. Press it firmly until it seats. Insert batteries if required by the model.
-
Restore power and configure settings. Flip the breaker back on. Follow the manufacturer’s setup instructions to set your schedule, Wi-Fi network, and temperature preferences.
Pro Tip: Smart thermostat installation typically takes 30–60 minutes. Budget extra time for the first setup on the app, especially if you are connecting to a Honeywell Home T9 or Ecobee SmartThermostat with voice control.
A methodical preparation approach including powering off, photographing, and labeling wires greatly increases DIY installation success. Homeowners who skip the labeling step are the ones who call for help afterward.
How do C-wires affect smart thermostat installation?
The C-wire, or common wire, provides continuous 24V power from your HVAC system to the thermostat. Smart thermostats need this power to run Wi-Fi, color displays, and onboard processors around the clock. Without it, you get symptoms like a blank screen, dropped Wi-Fi, or a thermostat that reboots randomly.
How to check if you have a C-wire:
- Remove your current thermostat faceplate and look at the wiring terminals
- A wire connected to the terminal labeled “C” is your common wire
- If that terminal is empty or the wire is tucked unused behind the baseplate, you do not have an active C-wire
Your options when no C-wire is present:
| Situation | Best option | Notes |
|---|---|---|
| Unused C-wire wire already in wall | Activate it at the furnace control board | Requires opening the furnace panel |
| No C-wire wire at all | Install a C-wire adapter | Adds 20–30 minutes at the furnace end |
| Old or incompatible wiring | Hire a professional | Avoids damage to the furnace board |
| Heat-only system (2-wire) | Use a power-stealing thermostat | Limited to compatible models only |
Installing a C-wire adapter involves wiring at both the thermostat and the furnace control board. That adds time and complexity well beyond a standard thermostat swap. If you are not comfortable opening your furnace panel, this is the point where professional help pays off.
Most thermostat wiring errors trace back to incorrect wiring or missing continuous power. Fixing the C-wire situation first prevents the majority of post-install problems.
What are common mistakes and troubleshooting tips?
Most DIY thermostat installation failures come down to a short list of avoidable errors. Knowing them in advance saves you a second trip to the breaker box.
Common mistakes to avoid:
- Trusting wire color over terminal labels. Red wires are not always R wires. Always wire by terminal letter, not by color.
- Letting wires slip into the wall. Tape each wire to the wall or wrap it around a pencil before you start. A wire that falls into the wall cavity requires fishing it back out, which can mean cutting drywall.
- Skipping the voltage test. Confirming power is off with a tester takes 10 seconds. Skipping it risks electric shock.
- Poor thermostat placement. A thermostat mounted in direct sunlight, near a drafty window, or above a heat vent will read temperatures incorrectly. Your HVAC system will short-cycle or run too long as a result.
- Ignoring compatibility. Homeowners who underestimate wiring compatibility risk installation failures or device malfunction. Check your new thermostat’s compatibility tool before purchasing.
Troubleshooting after installation:
Thermostat is unresponsive: Check that the breaker is on, batteries are installed (if required), and all wires are firmly seated in their terminals. Most installation issues stem from power supply problems, not defective thermostats.
If your system short-cycles (turns on and off rapidly), check for a wire touching the wrong terminal. If the display is blank after confirming power, the C-wire situation is the most likely cause. For persistent issues, the HVAC troubleshooting guide from Kcaircontrol covers common post-install scenarios in detail.
Pro Tip: Call a professional if your wiring has more than six wires, if you see corrosion on the terminals, or if your system uses a heat pump with auxiliary heat. These setups require wiring knowledge beyond a standard thermostat replacement.
Key Takeaways
Successful thermostat installation depends on three things: confirmed power off, accurate wire labeling by terminal letter, and understanding your C-wire status before you buy a smart thermostat.
| Point | Details |
|---|---|
| Safety comes first | Always verify power is off with a voltage tester before touching any wires. |
| Label by terminal letter | Wire colors vary by manufacturer; terminal letters are the reliable standard. |
| C-wire is critical for smart thermostats | Missing C-wire causes Wi-Fi drops and blank displays; resolve it before installing. |
| Placement affects accuracy | Avoid direct sunlight, drafts, and heat vents to get accurate temperature readings. |
| Know when to call a pro | Complex wiring, heat pump systems, or missing C-wire at the furnace warrant professional help. |
What I have learned after years of watching thermostat installs go wrong
The number one mistake I see is homeowners buying a smart thermostat first and checking compatibility second. A Honeywell Home T6 Pro or an Ecobee SmartThermostat Premium is a great device. But if your home runs a two-wire heat-only system or an older heat pump setup, that device may not work without significant rewiring. Check the compatibility tool on the manufacturer’s website before you spend $150 or more.
The second thing I want to flag is the C-wire situation. Most guides mention it briefly. I want to be direct: if you do not have an active C-wire and you install a smart thermostat anyway, you will likely have problems within weeks. The thermostat will steal power from other wires to compensate, which causes erratic HVAC behavior. Fix the C-wire first, even if it means opening the furnace panel or calling a technician.
Preparation is what separates a clean 45-minute install from a two-hour frustration session. Take the photo, label the wires, and confirm power is off. Those three steps cost you five minutes and save you from the most common failures. If you are ever unsure about your wiring, a professional visit is far cheaper than replacing a damaged furnace control board.
— AB
Kcaircontrol is here when the wiring gets complicated
Some thermostat installs are straightforward. Others reveal outdated wiring, missing C-wires, or HVAC systems that need more than a new control device. Kcaircontrol has served Kansas City homeowners for over 70 years, and our technicians handle every level of thermostat and HVAC complexity.
If your installation hits a wall, or if you want the job done right the first time, our team is ready. We cover everything from smart thermostat wiring to full system diagnostics. For urgent issues, our emergency HVAC repair options get your system back online fast. Contact Kcaircontrol to schedule service and get your home comfortable again.
FAQ
What tools do I need to install a thermostat?
You need a Phillips-head screwdriver, a voltage tester, a level, and wire labels or masking tape. A drill with wall anchors is helpful if your wall surface does not have studs at the right location.
How long does thermostat installation take?
A standard thermostat swap takes 30–60 minutes. Adding a C-wire adapter at the furnace adds another 20–30 minutes to the total job time.
Do I need a C-wire for a smart thermostat?
Yes. Smart thermostats require continuous 24V power from a C-wire to run Wi-Fi and display functions reliably. Without it, expect dropped connections and blank screens.
Why should I label wires by terminal letter and not by color?
Wire color codes are not standardized across HVAC manufacturers. Terminal labels are the reliable authority for correct wiring, and using them prevents the most common DIY wiring errors.
When should I call a professional for thermostat installation?
Call a professional if your system has a heat pump with auxiliary heat, more than six wires, corroded terminals, or if you cannot locate or activate a C-wire. Wiring compatibility issues are the leading cause of installation failures that require service calls.