
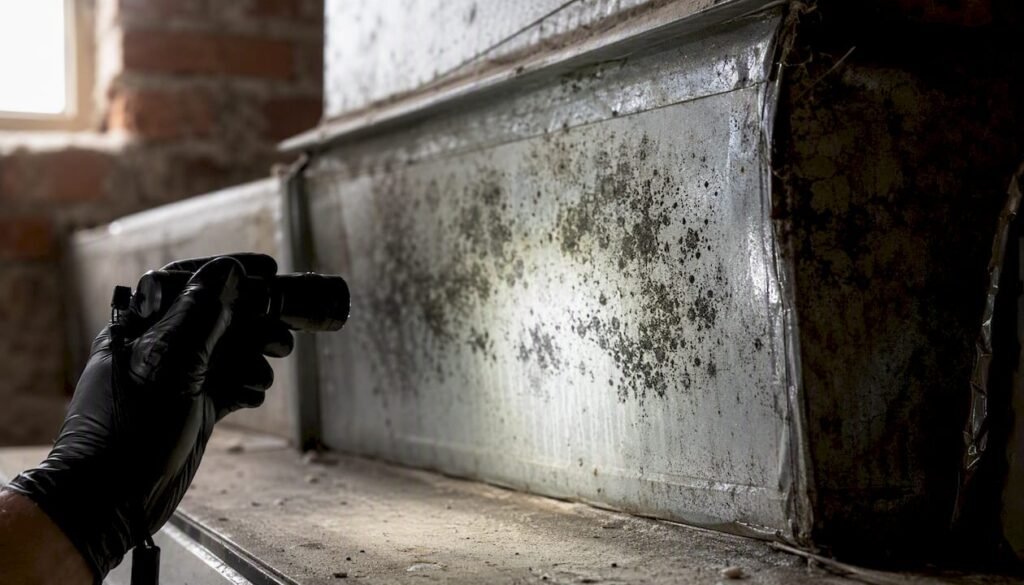
If you smell a musty odor every time your HVAC system kicks on, or you spot dark specks around your vent covers, stop the guessing game and shut down the system before doing anything else. Running a contaminated system pushes mold spores through every room it serves, turning a contained problem into a whole-house one. Avoid touching or wiping the vents until you know what you’re dealing with, since disturbing dry mold releases spores into the air you breathe.
Here’s your immediate checklist:
- Turn off the HVAC system if visible mold, a strong musty smell, or recent water damage points to contamination.
- Do a quick visual check of accessible vent covers and returns without removing ductwork or scraping surfaces.
- Hold off on DIY cleaning if the moldy area looks larger than a sheet of notebook paper, or if it’s inside the ductwork itself rather than on the visible vent face.
The EPA sets a practical DIY threshold of about 10 square feet for surface mold on hard materials. Beyond that, or if the growth is inside the duct system rather than on an exposed surface, the agency recommends professional evaluation. Fixing the moisture source always comes first. Cleaning mold without correcting the leak, condensation, or humidity problem behind it just buys you a few weeks before it returns.
Key Takeaways
Fixing the moisture source and hiring a certified professional for anything beyond a small, accessible surface patch is the most reliable way to solve mold in air ducts for good.
| Point | Details |
|---|---|
| Stop the system first | Turn off the HVAC immediately if you suspect heavy contamination, to avoid spreading spores house-wide. |
| Respect the 10 sq ft rule | DIY cleaning applies only to small, accessible surface mold on hard materials, per EPA guidance. |
| Fix moisture before cleaning | Cleaning without correcting the leak or humidity source guarantees the mold returns. |
| Hire pros for hidden components | Coils, drain pans, and ductwork interiors need professional access and, sometimes, lab testing. |
| Book Kcaircontrol for inspection | Kcaircontrol offers on-site inspection, duct cleaning, and coil service to diagnose and fix the actual cause. |
Table of Contents
- Why Mold in Air Ducts Is a Bigger Health Issue Than It Looks
- How Do You Inspect Vents and Ducts for Mold Yourself?
- What Can a Professional Inspection Confirm That You Can’t?
- How Do You Actually Remove Mold From Air Ducts?
- When Should You Hire a Professional, and What Should It Cost?
- How Do You Keep Mold From Coming Back?
- Why We Recommend a Professional Look at Your Ductwork
- What Our Duct Inspection and Remediation Service Covers
- Sources
Why Mold in Air Ducts Is a Bigger Health Issue Than It Looks
Mold growing inside your ductwork doesn’t stay put. Every time the blower runs, it carries spores through the supply vents and into the air your household breathes, which is why a small colony on one coil can affect air quality in every room the system serves.
The CDC links mold exposure to a specific set of symptoms that tend to show up gradually, then get written off as seasonal allergies:
- Nasal and sinus congestion
- Persistent cough or throat irritation
- Wheezing or shortness of breath
- Eye and skin irritation
Certain people face higher stakes. Anyone with asthma, chronic obstructive pulmonary disease, or a compromised immune system can react more severely to airborne mold exposure than the average adult, and infants and older residents often show symptoms sooner. If someone in your household has unexplained respiratory flare-ups that improve when they leave the house, the ductwork deserves a serious look.
A few situations move this from “worth monitoring” to “handle it now”: visible growth covering more than a small patch, a musty smell that persists even when the system has been off for hours, or new respiratory symptoms in a vulnerable family member that started around the same time you noticed the odor. When any of those line up together, treat it as an active problem rather than a maybe.
How Do You Inspect Vents and Ducts for Mold Yourself?
A homeowner inspection can reliably confirm what’s happening at the surface: discoloration on vent covers, a persistent musty smell, a filter that’s clogged and gray-black instead of white. What it can’t tell you is whether mold has colonized deeper inside the ductwork, on the evaporator coil, or in the drain pan, since those components sit behind sealed metal you shouldn’t be opening without training.
Here’s how to run a safe, useful inspection:
- Gear up first. Put on an N95 mask, disposable gloves, and safety goggles before getting close to any suspected mold.
- Grab basic tools. A flashlight, a small mirror for angled views, and a screwdriver to remove vent covers are all you need.
- Remove and examine one vent cover. Look for discoloration, fuzzy or slimy texture, water staining, or a black film that wipes off dry versus one that smears.
- Check for active moisture. Feel around the vent opening for dampness and look for water stains on nearby drywall or ceiling tiles.
- Photograph everything. Take close-up and wide shots with something for scale, like a coin or ruler, so you have a record if you need a professional opinion later.
What you’re looking for at each vent:
- Black, gray, or greenish fuzzy patches (likely active mold)
- A slick, slimy coating rather than dry buildup
- Water rings, streaking, or rust near the register box
- A persistent musty odor even when the vent cover looks clean
Pro Tip: Never spray bleach or any liquid cleaner directly into a duct opening. It can push moisture and spores deeper into the system instead of removing them, and bleach doesn’t penetrate porous materials like insulation anyway.
If you find growth beyond the vent cover itself, or the smell persists after cleaning the accessible surfaces, that’s your signal to stop and call a professional. Central air conditioning units are largely inaccessible to homeowners by design, which is a different situation from a small portable unit you can pull apart and clean at your kitchen sink.
What Can a Professional Inspection Confirm That You Can’t?
A licensed HVAC technician or mold inspector can access and test the parts of your system that stay sealed off from a homeowner’s screwdriver and flashlight, including the evaporator coil, the condensate drain pan, and the return plenum. That access matters because mold in HVAC systems commonly starts at these components rather than at the vent face you can see.
A thorough professional visit typically includes:
- Moisture readings at the coil, drain pan, and surrounding ductwork
- Visual and physical inspection of hard-to-reach duct sections
- Air or surface sampling sent to a lab when the growth needs confirmation
- A written scope of what’s contaminated and what caused it
Not every mold-like stain is actually mold. The EPA notes that dust streaks, soot, and mineral deposits often get mistaken for biological growth, and a visual guess can send you toward remediation you don’t need or, worse, away from remediation you do. Lab testing earns its cost when the finding is disputed, when you’re filing an insurance claim, or when you’re deciding whether to replace expensive porous materials like flexible ductwork rather than clean them.
Pro Tip: Ask any inspector whether their technicians hold certification through NADCA (the National Air Duct Cleaners Association) or IICRC (the Institute of Inspection, Cleaning and Restoration Certification). These credentials signal a company trained specifically in duct and mold protocols, not just general HVAC repair.
How Do You Actually Remove Mold From Air Ducts?
Homeowners can handle two things safely: cleaning visible mold off vent covers and grilles, and replacing a contaminated filter. Anything beyond that, mold growing inside the ductwork itself, on the evaporator coil, or covering more than roughly 10 square feet of surface, falls outside the EPA’s DIY guidance and into professional territory.
For the vent covers and filters you can reach:
- Turn off the HVAC system and remove the vent cover with a screwdriver.
- Take it outside or to a well-ventilated area to limit spore spread indoors.
- Scrub with warm water and a mild detergent, not bleach, using a stiff brush for grooves.
- Let it dry completely before reinstalling, since reattaching a damp cover invites new growth.
- Bag contaminated filters and cleaning rags in a sealed plastic bag before placing them in outdoor trash, rather than an indoor bin.
- Wash any clothing worn during cleanup separately, on hot, once you’re done.
Professional remediation looks different because the scope is different. A SERVPRO breakdown of vent mold notes that surface cleaning alone rarely solves the problem if moisture is still feeding it, which is why full remediation includes several additional steps:
| Remediation Step | What It Involves |
|---|---|
| Containment setup | Sealing off the work area to prevent spore migration to clean parts of the home |
| HEPA filtration/air scrubbing | Running negative-pressure air scrubbers to capture airborne spores during work |
| Porous material removal | Replacing contaminated flex duct, insulation, or ductboard that cannot be cleaned |
| Coil and drain pan service | Cleaning or treating the evaporator coil and condensate pan, common mold origin points |
| Post-remediation verification | Visual check or clearance testing to confirm the contamination is resolved |
Porous materials deserve special attention. Once mold colonizes flexible duct liner or fiberglass ductboard, the only reliable fix is removal and replacement, not cleaning, because the material’s texture holds spores too deep for surface treatment to reach.
Skip anything marketed as an instant fix. Ozone generators and fogging devices are not proven substitutes for physical remediation and can create their own indoor air quality problems. Sanding or scraping moldy porous material, meanwhile, aerosolizes spores rather than removing them safely.
Pro Tip: UV lights installed near the coil help control biological growth going forward, but they’re a maintenance add-on, not a stand-alone remediation method for existing contamination.
When Should You Hire a Professional, and What Should It Cost?
Call in a professional once visible mold exceeds a small patch, shows up inside ductwork you can’t reach, or coincides with real symptoms in your household. Waiting past that point usually means a bigger cleanup bill later, since contamination spreads with every heating and cooling cycle.
Before hiring anyone, ask about:
- Certification. Look for NADCA membership or IICRC training specific to mold remediation.
- Insurance and licensing. Request proof before work begins, not after.
- References. A company confident in its work will provide recent local customers.
- Inspection first. A legitimate provider inspects and scopes the job before quoting a flat price.
Typical costs vary with the size of the contamination, how many components need replacing, and how hard the ductwork is to access. One consumer pricing source puts duct-related mold remediation in the rough range of $600 to $2,000, though larger jobs involving full duct replacement or hidden moisture repairs can run higher.
| Cost Factor | Impact on Price |
|---|---|
| Size of contamination | Larger surface area or multiple duct runs raise labor and materials cost |
| Materials needing replacement | Porous ductwork or insulation replacement adds to the total |
| Access difficulty | Crawl spaces or tight attics increase labor time |
| Moisture source repair | Fixing the leak or condensation issue is often billed separately |
Before signing anything, ask the provider for a written scope of work, details on containment methods, whether lab testing is included, and what warranty backs the job. Walk away from anyone who quotes a single flat price without inspecting first, or who mentions ozone generators as part of the plan. Those are the two biggest red flags in this industry.
How Do You Keep Mold From Coming Back?
Moisture control beats every other prevention strategy combined. Keeping indoor relative humidity under roughly 50% and fixing leaks quickly does more to prevent duct mold than any cleaning product on the market.
Build these habits into a maintenance routine:
- Replace HVAC filters on schedule, typically every one to three months depending on filter type and household conditions.
- Schedule an annual HVAC tune-up to catch condensate drain clogs and coil buildup before they become mold colonies.
- Inspect the condensate pan and drain line for standing water or slow drainage.
- Confirm dryer, kitchen, and bathroom exhaust fans vent outside, not into an attic or crawl space.
- Seal and insulate ductwork running through unconditioned spaces to prevent condensation on the outside of the duct.
A dehumidifier helps in basements and humid climates where the HVAC system alone can’t keep pace, and upgrading to a higher MERV-rated filter reduces the organic debris that feeds mold growth inside the system. Sealed, well-insulated ductwork also matters more than people assume, since poor duct insulation creates the exact condensation conditions mold needs to take hold.
Pro Tip: Preventing recurrence has less to do with chemical treatments inside the ducts and more to do with consistent filter changes, condensate maintenance, and humidity control. Those three habits address the root cause instead of masking the symptom.
Why We Recommend a Professional Look at Your Ductwork
HVAC systems hide their problems well. The parts most likely to grow mold, the evaporator coil, the drain pan, the inside of flexible ductwork, sit behind sealed components that a flashlight and screwdriver simply can’t reach. That’s the honest reason Kcaircontrol pushes homeowners toward a professional inspection rather than a confident DIY guess: hidden moisture sources are common, and misdiagnosing them wastes both time and money.
Kcaircontrol’s technicians work from the same framework this article follows: locate the moisture source, confirm the scope of contamination, then treat the actual problem rather than just the smell. That covers everything from initial inspection and duct cleaning to coil and drain pan service, dehumidification setup, and duct sealing where condensation is the underlying culprit.
If your situation matches the checklist in this article, a musty smell that won’t quit, visible growth larger than a small patch, or symptoms that improve when you leave the house, a booked inspection tells you exactly what’s happening instead of leaving you to guess. If it’s a smaller, surface-level issue, a technician can tell you that too, and save you the cost of unnecessary remediation.
What Our Duct Inspection and Remediation Service Covers
Kcaircontrol handles the parts of duct mold you can’t safely reach on your own, starting with an on-site inspection that checks the coil, drain pan, and accessible duct runs for both moisture and growth. From there, the scope can include duct cleaning, coil cleaning, condensate line service, and repairing the moisture source that caused the problem in the first place.

Homeowners weighing a DIY approach against hiring out often find the deciding factor isn’t cost, it’s access. A technician can safely open and inspect components that stay sealed for good reason, and that access is what turns a guess into an actual diagnosis. At your appointment, expect a walkthrough of the system, a clear explanation of what’s found, and a written plan before any work begins, no pressure to sign on for more than what your ducts actually need.
Ready to find out what’s really going on inside your ductwork? You can book an inspection online and get a technician out to assess the system directly, or start with duct cleaning if you already know surface buildup is the main issue.
Sources
- Should I have the air ducts in my home cleaned? | US EPA
- Mold in HVAC Air Ducts: Causes, Signs, and Removal Tips – Bob Vila
This article is general information, not a substitute for advice from a qualified doctor. Consult a qualified healthcare professional about your own circumstances before acting on anything here.